ANNONCE
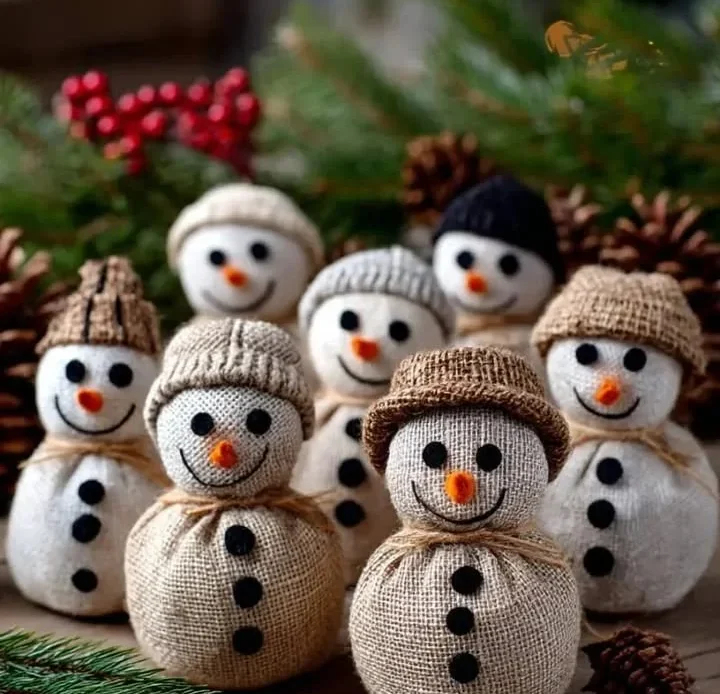
# DIY Burlap Snowmen Decorated with Buttons, Twine Scarves, and Cozy Hats

**Meta Description:** Transform your space this season with DIY burlap snowmen decorated with buttons, twine scarves, and cozy hats. Follow our step-by-step guide to add warmth and creativity to your home decor!

## Introduction: A Personal Journey in DIY Decor

Every time I decide to refresh my space, I’m reminded how a few small changes can completely shift the mood. I remember the first time I crafted DIY burlap snowmen decorated with buttons, twine scarves, and cozy hats. I wasn't expecting such a big difference, but the results transformed my home into something warm, personal, and full of life. These charming burlap snowmen have since become a centerpiece for winter gatherings, adding a cozy touch that delights family and friends alike.

## Why Will You Like This DIY Burlap Snowmen Decorated with Buttons, Twine Scarves, and Cozy Hats?

You’ll love this DIY burlap snowmen project because it combines creativity, elegance, and practicality. You don’t need to hire a designer or have a large budget — just a sprinkle of inspiration and a few simple steps to make your space reflect your personality. Not only do these snowmen serve as delightful decor, but they also allow you to express your creative flair through color, fabric, and thoughtful details.

## Materials and Tools Needed for DIY Burlap Snowmen

### Supplies Required:
- **Burlap Fabric:** The main material for your snowmen’s bodies. Choose natural or colored burlap to suit your style.
- **Buttons:** For eyes and embellishments, different sizes and colors add a charming character.
- **Twine:** Create cozy scarves that can be knotted around the neck of your snowmen.
- **Cozy Mini Hats:** You can either make your hats with fabric scraps or purchase cute little hats.
- **Rice or Beans:** To fill the burlap for stability.
- **Scissors:** For cutting the burlap and twine.
- **Glue Gun:** For attaching buttons and securing other elements.
- **Measuring Tape:** To ensure your burlap pieces are perfectly sized.

## Step-by-Step Guide: How to Create DIY Burlap Snowmen Decorated with Buttons, Twine Scarves, and Cozy Hats

### 1. Plan and Prepare
- **Visualize Your Final Look:** Create a simple sketch or a digital mood board featuring the design of your snowmen.
- **Define Your Goal:** Decide if you want your snowy friends to evoke comfort, elegance, or be a functional decor piece.
- **Measure Your Space:** Consider where you will place your snowmen.

### 2. Choose Materials and Colors
- **Select Colors:** Choose a main and accent color that fits your desired aesthetic. Classic white with vibrant accents works beautifully.
- **Pick Materials:** Determine whether you want a rustic vibe or a more polished look based on your overall home decor.

### 3. Assemble and Arrange
- Start with the burlap base: Cut two equal pieces of burlap and sew or glue them to form a bag. Fill with rice or beans for support.
- Shape your snowmen by tying off the burlap at the top.
- Add the twine scarf and cozy hat, securing them with the glue gun.

### 4. Add Decorative Details
- Attach buttons for eyes and down the front, giving your snowmen their character.
- Play with textures by adding different fabrics or nature elements like pinecones as a base.

### 5. Finishing Touches
- Stand back and evaluate your creation. Does it look balanced and appealing?
- Adjust the positioning of the elements as needed, and finalize with glue.
- Capture stunning photos of your DIY burlap snowmen — they're perfect for sharing on your social media!

## How to Attach or Secure DIY Burlap Snowmen Elements

- Use **transparent hooks** or **decor-safe adhesive strips** for lightweight components.
- Secure floral or ribbon accessories with thin wire or removable tape.
- Avoid permanent solutions like nails for delicate setups.
- For fabrics, use temporary rods or clips that won’t damage your surfaces.

## Factors Affecting Quantity of Materials for DIY Burlap Snowmen

- **Room Size:** Larger areas require more snowmen for balance in decor.
- **Color Scheme:** Light tones might need layering to stand out.
- **Lighting Conditions:** Dark spaces benefit from brighter accents.
- **Theme Intensity:** A minimalist approach demands fewer detailed pieces.

## What Is a Budget-Friendly DIY Burlap Snowmen Project?

Creating budget-friendly DIY burlap snowmen does not require you to compromise on beauty.
- Use materials you already have.
- Repurpose old clothing for scarves or hats.
- Handmade touches can elevate even the simplest designs, proving that creativity outweighs cost.

## Money-Saving Tips for DIY Burlap Snowmen

- **Set a Budget:** Decide how much you’re willing to spend before you start gathering materials.
- **Compare Prices:** Do a little research online and in local craft stores for the best deals.
- **Utilize Natural Materials:** Incorporate items from nature or recycled materials whenever possible.
- **Focus on Impactful Details:** Sometimes, smaller, thoughtful touches can make a significant difference without breaking the bank.

## FAQs About Creating DIY Burlap Snowmen

**Q: How long does it take to complete DIY burlap snowmen?**
A: It can vary based on complexity — typically, a few hours for simpler designs.

**Q: What color palette works best?**
A: Stick to a three-tone rule: one base, one accent, and one highlight color for a harmonious look.

**Q: Can I mix different styles for my snowmen?**
A: Absolutely! Just ensure there's a connecting element, like material or color, to maintain harmony.

## Your Turn to Create DIY Burlap Snowmen Decorated with Buttons, Twine Scarves, and Cozy Hats

Now it’s your time to channel your creativity! Start small — rearranging a corner or repainting a space can create your cozy winter wonderland. DIY burlap snowmen decorated with buttons, twine scarves, and cozy hats are not just pieces of decoration; they reflect your lifestyle and stories. Every piece you add brings warmth, charm, and a touch of personality into your home.