ANNONCE
introduction
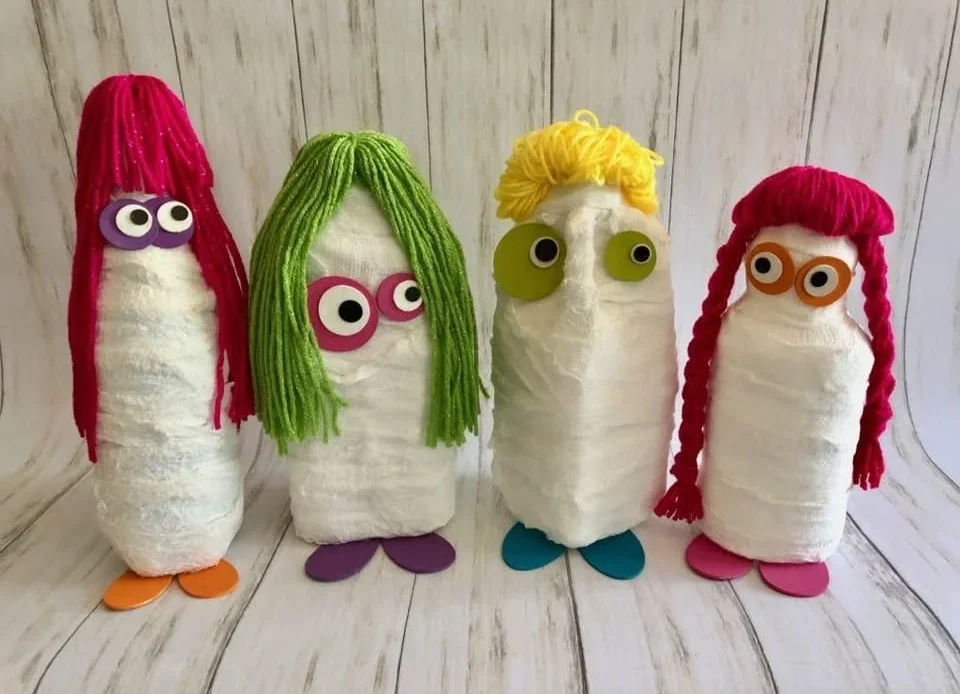
A few Halloween seasons ago, I stumbled upon a colorful mummy milk jug while browsing a local craft fair. It immediately caught my eye with its vibrant colors and whimsical design. It was no ordinary milk jug but rather an intricate piece that transformed this everyday object into a stunning decoration. That jug inspired me to embrace DIY projects during the Halloween season, adding a unique touch to my home decor. In this article, I want to share the joy of creating your very own Colorful Mummy Milk Jug, a fun project that can set the tone for your seasonal celebrations while also becoming a talking point in your home.
why you will like this Colorful Mummy Milk Jug
Creating a Colorful Mummy Milk Jug is more than just an art project; it’s an opportunity to express your creativity and personalize your home decor. Here are several reasons you’ll love this DIY decoration:
-
Unique Decor: Unlike mass-produced decorations, a handcrafted Colorful Mummy Milk Jug will add a genuine touch to your home. This unique aspect can spark conversation with your guests.
-
Customizable: You can adjust colors and themes according to your preference or holiday decor. Whether you want a spooky vibe for Halloween or a cheerful ambiance during fall, you can easily tweak the design.
-
Budget-Friendly: Using recyclable materials like old milk jugs not only reduces waste but also keeps your costs down. This project can fit into any budget, making it accessible for everyone.
-
Family-Friendly: This is an excellent project for all ages. Invite family members to join in, creating a wonderful opportunity for bonding while crafting something special together.
materials and tools needed for Colorful Mummy Milk Jug
Before embarking on your craft journey, you need to gather specific materials and tools. Here’s a comprehensive list to help ensure you have everything you need:
Materials:
- Plastic milk jug: An empty, clean milk jug serves as the base for your mummy.
- Gauze or cheesecloth: This will give your jug the mummy look. Choose various widths to add texture.
- Acrylic paints or spray paints: Bright colors such as orange, purple, and green work wonderfully.
- Binding agent: Use glue or fabric glue for securing parts.
- Googly eyes: These will bring your mummy to life!
- LED tealights: For a safe light source inside the jug, if desired.
Tools:
- Scissors: To cut the gauze or cheesecloth.
- Paintbrushes or spray paint nozzle: For painting your jug.
- Craft knife: For cutting holes, if needed.
- Palette or plate: For mixing paints, if working with acrylics.
With these materials and tools at your disposal, you’re ready to begin crafting your Colorful Mummy Milk Jug!
ANNONCE
step-by-step guide: how to create Colorful Mummy Milk Jug
Creating your Colorful Mummy Milk Jug is an exciting process. Follow these simple steps to bring your spooky yet vibrant creation to life:
Step 1: Prepare Your Jug
- Clean your milk jug thoroughly and remove any labels. Make sure it’s completely dry.
Step 2: Paint the Jug
- Using your choice of acrylic or spray paint, paint the entire jug in a base color of your choice. Bright colors like vibrant orange will make the mummy pop. Allow it to dry completely.
Step 3: Create the Mummy Wraps
- Cut your gauze or cheesecloth into strips of varying lengths and widths. This will create a texture when wrapped around the jug.
Step 4: Attach the Gauze
- Start wrapping the gauze around the jug starting from the bottom. Use glue to secure one end, then continue wrapping it around until the jug is covered as much as you like. Leave some gaps to create a more authentic mummy look.
Step 5: Add Eyes
- Once your wrapping is complete, place the googly eyes on the surface, using glue to secure them in place. Choose a fun expression to give your mummy character!
Step 6: Insert Lighting
- If you want to illuminate your mummy, place LED tealights inside the jug through the opening. This adds a spooky yet warm glow to your decor.
Step 7: Finishing Touches
- Go over any areas that need additional wrapping or touch-up paint if necessary. Feel free to personalize further with other decorations like glitter or ribbon if you desire.
When completed, your Colorful Mummy Milk Jug should be eye-catching and fit perfectly into your festive decor.
how to attach or secure Colorful Mummy Milk Jug elements
To add durability and ensure all elements of your Colorful Mummy Milk Jug stay intact, consider these securing techniques:
-
Use fabric glue: This type of glue is great at holding fabric pieces like gauze together. Apply it generously on edges where layers overlap.
-
Hot glue: For a quicker setting time, hot glue is an effective choice. Just take care when using it around kids, as it can get very hot.
-
Sewing or pinning: If you want the gauze to have a more permanent attachment, consider sewing it in place. Alternatively, you can use small safety pins to keep the layers secure.
-
Weight distribution: If your jug feels too light or wobbly, fill the bottom with some small stones or sand to maintain balance.
factors affecting quantity of materials for Colorful Mummy Milk Jug
When planning your Colorful Mummy Milk Jug project, several factors will dictate the amounts of materials you’ll need:
ANNONCE
-
Jug Size: Larger milk jugs will require more gauze and paint than smaller jugs. Be sure to account for this adjustment in your calculations.
-
Desired Coverage: If you plan to fully wrap the jug in gauze, you will need more fabric compared to just covering certain areas.
-
Additional Decor: Incorporating more decorative elements such as ribbons, stickers, or even fabric swatches will necessitate more materials.
-
The Look You Want to Achieve: A specific design may require different quantities of materials. Planning out the intended look can help determine your needs upfront.
budget-friendly tips for Colorful Mummy Milk Jug
Keeping costs down is crucial, especially for a project like this one. Here are some budget-friendly tips:
-
Reuse materials: Use old milk jugs, leftover materials from other crafts, and even scraps of gauze or fabric.
-
Buy in bulk: When purchasing materials like paint or gauze, consider buying in bulk if you plan to create several jugs or other decorations.
-
Shop at dollar stores: Many craft supplies can be found at dollar stores or discount stores. You can often find paint, fabric, and glues at affordable prices.
-
Host a craft swap: Connect with friends or family and exchange excess supplies. This way, you could get creative materials without spending a dime!
money-saving tips for Colorful Mummy Milk Jug
In addition to budget-friendly options, consider these money-saving strategies:
-
Sales and Discounts: Always look out for sales or coupons from craft stores. Many have seasonal promotions, especially around craft-heavy seasons like Halloween.
-
DIY Paints: If you’re up for a little experimentation, consider making your own paint using natural ingredients like coffee, tea, or vegetables for dying fabric colors.
-
Recycle and Upcycle: In addition to milk jugs, you can recycle other plastic containers. A large yogurt tub or even bottles can work as creative bases for your mummy.
-
Community Programs: Participate in local crafting groups or community events where materials might be provided, reducing the need for personal purchases.
FAQs about creating Colorful Mummy Milk Jug
1. Can I use a glass jug instead of plastic for my Colorful Mummy Milk Jug?
Yes, using a glass jug is an excellent option! However, be cautious with the weight and ensure proper handling during the crafting process.
2. How long does it take for the paint to dry completely?
Acrylic paint usually takes about 30 minutes to an hour to dry to the touch, but it’s recommended to let it cure for at least 24 hours before displaying the jug.
ANNONCE
3. What should I do if I run out of gauze?
If you run out of gauze, you can use an alternative like ripped fabric, ribbons, or even strips of an old sheet for a different texture and design.
your turn to create Colorful Mummy Milk Jug
Now that you have all the necessary information to create your own Colorful Mummy Milk Jug, it’s time to roll up your sleeves and enjoy the festive crafting process! Gather your materials, get creative, and let the colors and textures shine through each step of your DIY journey. You are bound to end up with a delightful piece that enhances your home decor and sets the tone for seasonal celebrations. Happy crafting!