ANNONCE
personal anecdote
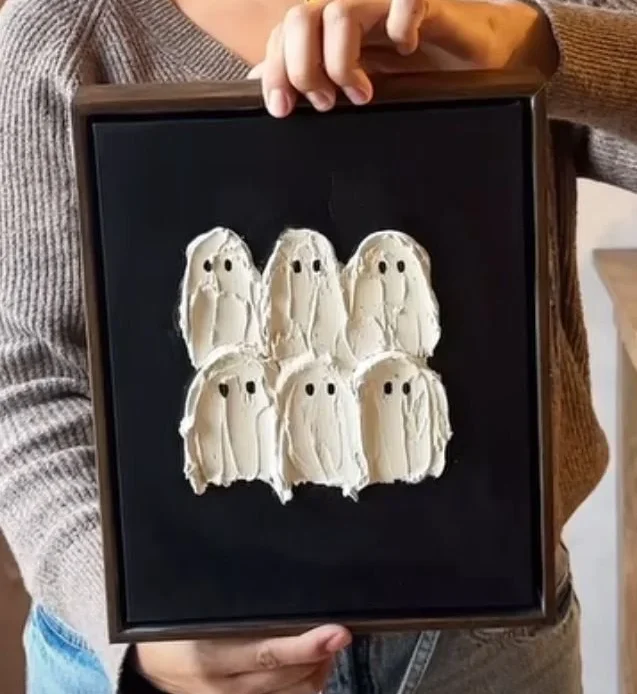
As the leaves began to change color and the nights grew crisp, my home transformed into a little haven for Halloween. In a vibrant frenzy of good-natured spookiness, I rummaged through my craft supplies, pulling out everything from miniature pumpkins to strings of twinkling lights. One year, driven by an urge to create something both eerie and beautiful, I embarked on a project that brought me immense joy: painting ghostly figures using textured paint against a dramatic dark background. It turned out to be one of the most satisfying DIY projects I’d ever tackled, and the result? A stunning piece of home decor that invoked both smiles and delights from friends and family alike.
why you will like this DIY Halloween Ghost Painting Using Textured Paint on a Dark Background
If you’re a fan of unique art pieces that evoke the spirit of Halloween, this DIY Halloween Ghost Painting will undoubtedly become your new favorite. Not only does it blend creativity with seasonal charm, but it also allows for personal expression tailored to your home decor style.
Here are several reasons why you will enjoy this DIY project:
-
Customizable Design: You can personalize the ghosts’ shapes, sizes, and expressions, making it a one-of-a-kind piece that reflects your aesthetic.
-
Textured Appeal: The use of textured paint adds dimension to your art, making it visually captivating. It creates depth and a tactile quality that flat artwork lacks.
-
Dark Background Contrast: The juxtaposition of the white or light ghostly figures on a dark background creates a striking visual that commands attention.
-
Cost-Effective: This project is affordable, requiring only basic materials, unlike store-bought art pieces that can be pricey.
-
Family Fun: This DIY project is perfect for family bonding. Get the kids involved and unleash collective creativity while strengthening family traditions.
-
Year-Round Decor: While ideal for Halloween, it can easily transition to be part of your year-round home decor, embracing a whimsical yet sophisticated vibe.
materials and tools needed for DIY Halloween Ghost Painting Using Textured Paint on a Dark Background
Before diving into your artistic venture, it’s essential to gather all the necessary materials. Here’s what you’ll need:
ANNONCE
Materials:
- Canvas or Art Board: Choose a size that fits your decor space; 16” x 20” is a popular choice.
- Textured Paint: Opt for an off-white, cream, or pale color for the ghosts. Acrylic textured paint works best.
- Paint for Background: A deep black, navy blue, or charcoal grey will create an effective backdrop.
- Paintbrushes: Select a range of sizes—large for background painting and smaller for detailing.
- Palette Knife or Texture Tool: For manipulating the textured paint.
- Sealant (Optional): A clear sealant can protect the finished painting.
- Pencil or Chalk: For sketching outlines before painting.
- Water Container: For rinsing brushes.
Tools:
- Easel or Flat Surface: A stable working area is essential.
- Drop Cloth or Old Newspapers: To protect surfaces from paint spills.
- Sponge (Optional): This can create unique textures and effects.
- Adhesive Tape: To secure your canvas while painting.
step-by-step guide: how to create DIY Halloween Ghost Painting Using Textured Paint on a Dark Background
Now that you have all your materials ready, let’s get started with the step-by-step process:
Step 1: Set Up Your Workspace
Begin by laying down your drop cloth or newspapers. Set up your canvas or art board on an easel or flat surface, ensuring it’s secure.
Step 2: Paint the Background
- Pour the black paint onto your palette. Using a large brush, apply a thick layer of paint across the entire canvas, covering any pre-existing patterns or colors.
- Allow the paint to dry completely—about an hour—before moving on to the next step.
Step 3: Sketch Your Ghosts
- Using your pencil or chalk, lightly outline the ghostly figures on the painted canvas. Play with varying sizes and shapes to create an intriguing composition.
- Consider adding elements like spooky eyes or a haunting smile, following your creative instincts.
Step 4: Apply Textured Paint
- With a palette knife or texture tool, take out your textured paint and begin applying it over your sketched ghosts. Use a dabbing motion, layering the paint to achieve depth and dimension.
- Experiment with various techniques (like swirling, patting, or even dragging) to create shadows and light effects that will enhance the ghostly appearance.
Step 5: Details and Finishing Touches
- Once the textured paint has dried, use a smaller brush to add details—perhaps a faint stroke for a ghostly arm or some whimsical facial features.
- If desired, some glow-in-the-dark paint can be mixed into your textures to make the ghosts come alive at night.
Step 6: Seal (Optional)
- If you wish, apply a clear coat sealant once the painting is entirely dry. This provides an added layer of protection, ensuring your masterpiece lasts through the seasons.
how to attach or secure DIY Halloween Ghost Painting Using Textured Paint on a Dark Background elements
Once your painting is complete, you will want to display your haunted art piece effectively. Here are a few ways to secure and showcase your artwork:
-
Wall Mounting: Use picture hangers or adhesive strips designed for indoor use. Ensure that they can support the weight of your textured masterpiece.
-
Easel Display: For a more dynamic presentation, you can set your painting on a decorative easel. This allows for flexibility in arrangements and can be easily moved around.
-
Frame it: If you’re looking for a polished look, consider framing your artwork. A simple black or white frame can enhance its beauty and make it a standout piece in your living space.
factors affecting quantity of materials for DIY Halloween Ghost Painting Using Textured Paint on a Dark Background
The amount of materials you’ll require for this project can vary considerably based on several factors:
ANNONCE
-
Canvas Size: A larger canvas will demand more paint and texture material than smaller ones.
-
Design Complexity: Intricate designs with numerous ghosts or elaborate backgrounds will need additional supplies.
-
Layering Technique: The number of layers of paint and texture you plan to apply can dictate the quantity of paint required.
-
Personal Style: Your personal approach will affect material amounts; some may prefer bold layers while others opt for a more understated application.
budget-friendly tips for DIY Halloween Ghost Painting Using Textured Paint on a Dark Background
Creating your Halloween artwork doesn’t need to break the bank. Here are some budget-friendly tips to keep in mind:
-
Use Leftover Materials: If you’ve done craft projects in the past, look through your supplies. You might find paints, brushes, and canvases that can be repurposed.
-
Shop Discount Stores: Craft stores often have sales or section dedicated to discounted supplies. Be sure to check for seasonal discounts.
-
Buy in Bulk: If you’re planning multiple projects or working with friends, purchasing in bulk can lead to substantial savings.
-
Reuse Your Tools: Instead of always buying new brushes, clean and reuse them for different colors and textures.
money-saving tips for DIY Halloween Ghost Painting Using Textured Paint on a Dark Background
Aside from the above tips, here are additional money-saving strategies for your DIY project:
-
DIY Texture: Instead of purchasing expensive textured paint, you can create your own by mixing sand or flour into regular paint.
-
Use Home Supplies: Old sponges, rags, or even crumpled paper can be repurposed as tools for texture creation instead of investing in new tools.
-
Plan Ahead: If possible, shop out of season or at clearance sales to stock up on materials for upcoming projects.
FAQs about creating DIY Halloween Ghost Painting Using Textured Paint on a Dark Background
-
Can I use different paint types for the background and ghosts?
- Yes, you can use acrylic for the background and textured paint for the ghosts. Just ensure compatibility for the best results.
-
Will the textured paint crack after it dries?
- Quality textured paint is designed to remain flexible once dried, though excessive layering can sometimes lead to cracks. It’s advisable to follow the product instructions for best results.
-
How do I clean up after painting?
- Clean brushes and tools with water immediately after use. For textured paint, ensure that you rinse thoroughly to prevent it from drying on your tools.
your turn to create DIY Halloween Ghost Painting Using Textured Paint on a Dark Background
With these helpful tips and a solid understanding of the DIY process, it’s your turn to unleash your creativity! Gather your materials, prepare your workspace, and follow the step-by-step guide to create a Halloween masterpiece that brings smiles instead of screams. Not only will your DIY Halloween Ghost Painting serve as a delightful decor piece, but it’ll also become a cherished memory of your creativity, marking the spirit of Halloween in your home for years to come. Enjoy the process, trust your instincts, and let the ghosts come to life!