ANNONCE
Personal Anecdote
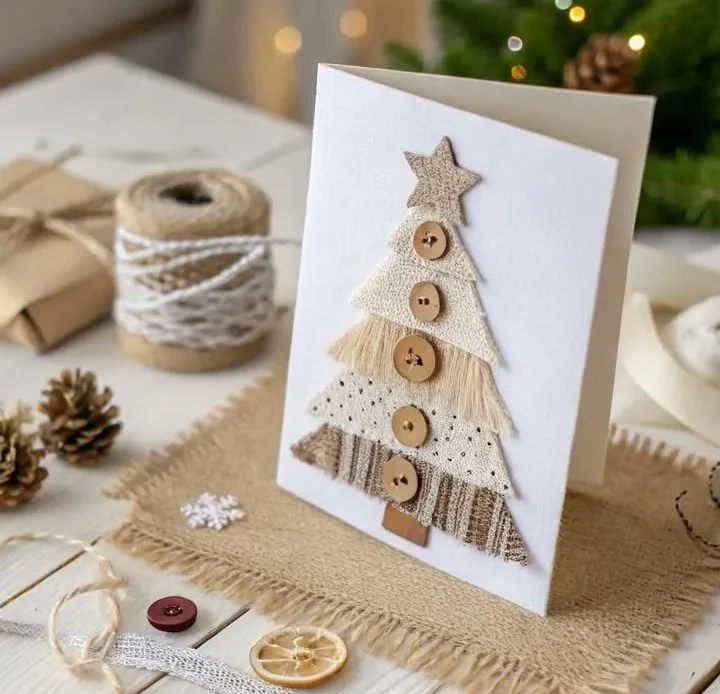
Every year, as the holiday season approaches, I find myself sifting through piles of store-bought Christmas cards, each one seemingly more generic than the last. I remember a particular year when I decided to break free from this cycle and made my own Christmas cards. I adorned them with homemade decorations, including a charming fabric tree and whimsical wooden buttons. It was an experience that transformed not just my cards, but also the way I viewed the holiday spirit.
While crafting, the aroma of pine and cinnamon filled the air, evoking heartwarming memories of past festivities. Each card became a small piece of art, reflecting my personal touch and creativity. This simple act of DIY not only rekindled my passion for crafting but also allowed me to share a piece of myself with friends and family, making them feel cherished. This year, I want to share this simple yet delightful project with you, as I believe it embodies the true spirit of Christmas.
Why You Will Like This DIY Christmas Card Decorated with Fabric Tree and Wooden Buttons
Creating your own Christmas card isn’t just about the finished product; it’s also about the process. There’s something incredibly satisfying about transforming plain materials into a heartfelt message for your loved ones. Here are a few reasons why you’ll love this particular DIY project:
- Personal Expression: Each card can be customized to reflect your style, making it unique to you or the recipient.
- Sentimental Value: A hand-crafted card carries more emotional weight than a store-bought option. Recipients often treasure these items long after the holidays.
- Creative Outlet: This project allows you to tap into your creative side and potentially discover a new hobby.
- Family Bonding: Engaging your family or friends in this creative process can strengthen relationships and create lasting memories.
- Sustainability: Crafting is an eco-friendly alternative to purchasing mass-produced items, especially when you reuse or recycle materials.
Materials and Tools Needed for DIY Christmas Card Decorated with Fabric Tree and Wooden Buttons
Before you dive into crafting, gather the following materials and tools to ensure a smooth creative experience:
ANNONCE
Materials
- Cardstock: Choose festive colors like red, green, or white for the base of your card.
- Fabric: Select various patterns for the Christmas tree, ideally in colors that evoke warmth and cheer.
- Wooden buttons: These serve as the ornaments for the fabric tree. You can find them in craft stores or online.
- Glue: A strong adhesive or fabric glue works well to secure the fabric and buttons.
- Scissors: Good quality scissors will help achieve precise cuts.
- Twine or ribbon: For extra decoration or as a means of attaching elements.
- Markers or pens: For writing your holiday messages inside the card.
Tools
- Sewing needle and thread (optional): If you want to stitch the fabric tree for added durability and charm.
- Embossing tools (optional): For adding texture to the card.
- Measuring tape or ruler: To ensure accurate dimensions when cutting your fabric and cardstock.
Step-by-Step Guide: How to Create DIY Christmas Card Decorated with Fabric Tree and Wooden Buttons
Creating your own DIY Christmas card can be a delightful endeavor. Here’s a friendly guide to help you along the way:
Step 1: Prepare Your Card Base
- Cut your cardstock to your desired size. A standard size is 5 x 7 inches when folded.
- Fold the cardstock in half to create the card base.
Step 2: Cut Out the Fabric Tree
- Using your measuring tape, determine the size you want your tree to be—around 4 to 5 inches tall is usually good.
- Cut a triangular shape from your fabric, making sure the base is wide enough to provide stability.
Step 3: Decorate Your Fabric Tree
- Utilize the wooden buttons as ornaments on your fabric tree. Lay them out in a pleasing arrangement before gluing them down.
- If you want to add extra details, sew or glue on additional fabric scraps or embellishments to enhance your tree.
Step 4: Attach the Tree to the Card
- Secure the fabric tree to the front of your card using a strong adhesive. Be sure to press firmly to ensure it sticks well.
Step 5: Add Personal Touches
- Write a heartfelt message on the inside of the card. Use colorful markers or pens to make it more festive.
- You may also want to tie some twine or ribbon around the card for a charming finishing touch.
Final Touch: Sign Off
- Don’t forget to sign your name and, if applicable, include the date.
How to Attach or Secure DIY Christmas Card Decorated with Fabric Tree and Wooden Buttons Elements
Securing the elements of your DIY Christmas card is essential to creating a polished look. Here are some tips:
- Use Fabric Glue: For fabric components, a fabric glue will hold better than regular adhesive.
- Layering: If you are using multiple materials, glue heavier items (like buttons) first before layering lighter materials above them.
- Test Adhesives: Always test your glue on a scrap piece before applying it to your card to ensure it doesn’t bleed through or damage your materials.
- Clamp or Weigh Down: After applying glue, place a weight on the card to help hold the items in place as they dry.
Factors Affecting Quantity of Materials for DIY Christmas Card Decorated with Fabric Tree and Wooden Buttons
When preparing for your DIY project, understanding the factors that influence the quantity of materials you’ll need is crucial:
- Number of Cards: Decide how many cards you wish to create. The greater the quantity, the more materials you’ll require.
- Complexity of Design: If you’re planning intricate designs with multiple embellishments, factor in extra materials.
- Size: Larger cards or trees mean that you’ll need more fabric and larger pieces of cardstock.
- Number of Decorations: Consider how many buttons or other decorative elements you wish to include on each tree.
By keeping these factors in mind, you can better estimate how much of each material you’ll need.
ANNONCE
Budget-Friendly Tips for DIY Christmas Card Decorated with Fabric Tree and Wooden Buttons
DIY doesn’t have to break the bank. Here are some budget-friendly tips to help you save:
- Shop Your Supplies: Before buying new materials, look through your craft supplies to see what you can repurpose.
- Bulk Buys: When purchasing buttons or fabric, consider buying in bulk. This can save money in the long run.
- Use Leftover Fabric: Instead of buying new fabric, use scraps from previous projects.
- Dollar Stores: Explore dollar stores or discount shops for materials; you’d be surprised at the quality of items available.
Money-Saving Tips for DIY Christmas Card Decorated with Fabric Tree and Wooden Buttons
Beyond just being budget-friendly, here are strategies to maximize your savings while crafting your DIY Christmas cards:
- Free Patterns: Search for free templates or patterns online for the tree design, rather than buying expensive craft books.
- Community Swaps: Engage in a local crafting group or online community where you can swap unused materials with others.
- Seasonal Sales: Keep an eye out for sales during the festive season where craft supplies may be discounted.
FAQs About Creating DIY Christmas Card Decorated with Fabric Tree and Wooden Buttons
Q1: Can I use any type of fabric for the tree?
Yes, you can use various types of fabric, but consider ones that are sturdy, like felt or cotton. These will hold their shape better.
Q2: What if I don’t have wooden buttons?
If wooden buttons aren’t available, you can easily substitute them with stickers, paper circles, or even beads.
ANNONCE
Q3: How long does it take to create each card?
Creating each card can take anywhere from 30 minutes to an hour, depending on the complexity of your design and experience level.
Your Turn to Create DIY Christmas Card Decorated with Fabric Tree and Wooden Buttons
Now that you have a comprehensive overview of creating your DIY Christmas card decorated with a fabric tree and wooden buttons, it’s time to unleash your creativity! Gather your materials, invite friends or family into the crafting process, and enjoy the satisfaction of creating something unique and personal.
This DIY project not only offers a great way to express your festive spirit, but it also serves as a reminder that thoughtful gestures resonate beyond the holiday season. So, pick up those scissors and glue, and let the crafting spirit fuel your Christmas cheer!