ANNONCE
personal anecdote
Growing up in a home filled with nature-inspired decor, I have always been drawn to the beauty of the outdoors. One of my fondest memories is collecting pine cones during family hikes in the crisp autumn air. My parents would often transform these simple treasures into home decor pieces that added warmth and a cozy touch to our living space. Years later, I found myself revisiting this tradition, wanting to recreate that joyous atmosphere in my home. Thus began my journey into the aesthetic world of the Hanging Pine Cone Idea—a charming way to incorporate elements of nature into your home decor.
why you will like this Hanging Pine Cone Idea
The Hanging Pine Cone Idea is not just a craft project; it is a sentiment that captures the essence of rustic charm and the allure of nature. Here are a few reasons why you will love this home decor idea:
- Natural Beauty: Pine cones bring an organic feel to any space, acting as nature’s art.
- Versatile Decor: Whether you wish to embellish a cozy nook or add character to your holiday decor, pine cones adapt beautifully to various themes.
- DIY Personalization: This project offers endless opportunities for creativity, allowing you to infuse your personality into your home decor.
- Sustainability: Using natural materials is eco-friendly, reducing waste and showcasing items that are often ignored or discarded.
- Family-Friendly Project: Involving kids in crafting enhances family bonding and instills creativity from a young age.
materials and tools needed for Hanging Pine Cone Idea
Before diving into the creation process, gather the necessary materials and tools. Below is a comprehensive list to help you prepare for this delightful project.
Materials
- Pine cones (the quantity depends on your design)
- Twine, jute, or fishing line (for hanging)
- Embellishments (e.g., paint, glitter, ribbon, or artificial flowers)
- A small wooden or metal hoop (if desired, for added style)
- Hot glue or craft glue
- Craft wire (for securing certain elements)
Tools
- Scissors
- Glue gun (optional but recommended for quicker adhesion)
- Pliers (if using craft wire)
- Spray adhesive (optional, for a glitter effect)
- Paintbrush (if painting)
step-by-step guide: how to create Hanging Pine Cone Idea
Creating your own Hanging Pine Cone decor is simple and rewarding. Here’s a detailed step-by-step guide to help bring your vision to life.
ANNONCE
Step 1: Prepare the Pine Cones
- Cleaning: Gently clean the pine cones under running water to remove any dirt or debris. Make sure they dry completely before proceeding.
- Optional Painting: If you’d like to personalize your pine cones, use spray paint or a brush to apply your desired color—perhaps a warm gold or a cheerful red for the holiday season.
Step 2: Add Embellishments
- Glitter: To add a little sparkle, apply a thin layer of glue on certain areas of the pine cone and sprinkle glitter over it. Allow it to dry.
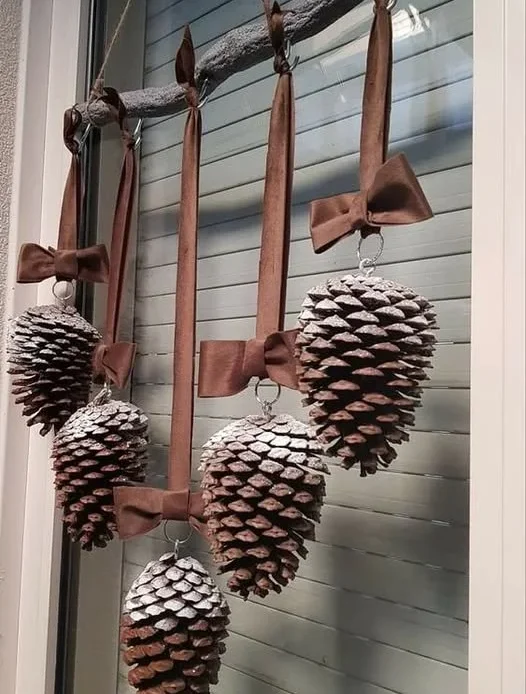
- Ribbons: You can tying colorful ribbons around the base of the pine cone, creating a upside-down cherry effect.
Step 3: Attach the Hanging Mechanism
- Twine/Symbol: Cut a length of twine or fishing line. Loop it through the top of the pine cone. if desired, make a knot to secure it firmly in place.
- Wooden Hoop: If using a hoop, start by attaching a few pine cones around it either with hot glue or tying them with twine to create a hanging mobile effect.
Step 4: Hang Your Creation
- Decide on the location to hang your pine cone masterpiece—a window, a branch, or even a ceiling hook are great choices. Make sure to securely tie or hang the twine or fishing line to prevent it from falling.
how to attach or secure Hanging Pine Cone Idea elements
Proper securing techniques ensure that your Hanging Pine Cone decor remains intact, allowing you to enjoy it for seasons to come. Here are some methods for attaching elements:
- Hot Glue: For sturdiness, especially when adding embellishments, hot glue works best. Apply generously to the necessary parts and hold them together for a few seconds to achieve a strong bond.
- Twine: For hanging, ensure your twine has enough tension. If your pine cones are heavy with embellishments, consider doubling the twine for added strength.
- Wire: For more intricate designs, craft wire can be used. Pliers make it easier to twist and secure the wire around the pine cone and the hanging mechanism.
factors affecting quantity of materials for Hanging Pine Cone Idea
The quantity of materials you require for your Hanging Pine Cone Idea largely depends on your desired design. Various factors include:
- Design Complexity: A simple hanging with just a few pine cones will require less material than a larger, more intricate design.
- Size: The size of the pine cones you choose affects how many you can incorporate; larger cones will take up more space.
- Embellishments: Adding multiple embellishments, such as ribbons or flowers, increases the demand for additional glue and supporting materials.
- Space Availability: Consider the area where you plan to hang your decor. A more spacious environment may need larger quantities to maintain balance and visual impact.
budget-friendly tips for Hanging Pine Cone Idea
Creating a beautiful Hanging Pine Cone decor piece does not need to break the bank. Here are some budget-friendly tips:
- Gather Natural Materials: Collect pine cones from nearby parks or your backyard to save costs on purchasing.
- Repurpose Items: Look around your home for unused supplies—old ribbons, twine, or even paint can all find a new life in your hanging decor.
- Buy in Bulk: If purchasing materials, buy in bulk or team up with friends to split costs.
money-saving tips for Hanging Pine Cone Idea
In addition to the above, here are more money-saving strategies:
ANNONCE
- Time of Year: Consider creating your hanging pine cone designs during fall or winter when pine cones are plentiful and often on clearance.
- Sales and Discounts: Watch for seasonal sales at craft stores; stock up on materials when they’re discounted.
- DIY Embellishments: Consider making your own embellishments, such as dyed paper flowers, instead of buying pre-made ones.
FAQs about creating Hanging Pine Cone Idea
1. Can I use different types of pine cones for this project?
Absolutely! While some pine cones may be larger or smaller than others, they can all work together beautifully in a hanging display. Mixing varieties adds interest and texture.
2. How can I ensure my pine cones stay closed and do not open during the drying process?
To prevent your pine cones from opening, consider drying them on a baking sheet in a low-temperature oven for about 30 minutes. This should help them stay in their closed shape.
3. How do I care for my Hanging Pine Cone decor?
While pine cones are generally durable, it’s best to keep your hanging decor in a dry place away from moisture to prevent mold. Dust it gently with a damp cloth if necessary.
your turn to create Hanging Pine Cone Idea
Now that you have all the information you need, it’s time to unleash your creativity! Gather your materials and follow the step-by-step guide to create your very own Hanging Pine Cone decor. Experiment with styles, colors, and forms to reflect your unique taste. Celebrate nature within your home and let it whisper tales of the great outdoors, just as it did in my childhood. Happy crafting!
ANNONCE