ANNONCE
personal anecdote
Growing up in the countryside, I was surrounded by nature’s beauty. One of my fondest memories was collecting pine cones from the nearby forest with my siblings. We would gather them in heaps, inventing stories and dreaming up decorations for our home. Fast forward to today, and I still cherish that connection to nature. Rediscovering the versatile, rustic charm of pine cones has led me to embrace them in my home decor, particularly through the Hanging Pine Cone Idea. This delightful project not only brings a taste of the wilderness indoors, but it also allows me to relive those childhood memories. There’s something magical about transforming a simple, natural element into an eye-catching decor piece that tells a story.
why you will like this Hanging Pine Cone Idea
The Hanging Pine Cone Idea is more than just a home decoration; it’s an opportunity to engage with nature, unleash your creativity, and personalize your living space. Here’s why you’ll fall in love with this project:
-
Natural Beauty: Pine cones possess an organic charm that adds warmth and texture to your decor. Whether you’re enhancing a rustic theme or adding an earthy touch to a modern space, pine cones blend seamlessly into various styles.
-
Customization: You can customize the colors and designs of your hanging pine cones to suit any season or occasion. Paint them in vibrant colors for a festive look or keep them natural for a neutral, rustic vibe.
-
Sustainability: Utilizing natural materials is an eco-friendly choice. By decorating with pine cones, you’re choosing a biodegradable option that celebrates nature.
-
Cost-Effective: This DIY project is budget-friendly. Pine cones are often free for the taking, and the additional materials you might need can be easily found at home or at a low cost.
-
Family Fun: This project is perfect for family crafting, allowing everyone to unleash their creativity together. From picking out pine cones to crafting them into decor, this is a wholesome activity for all ages.
materials and tools needed for Hanging Pine Cone Idea
To embark on your hanging pine cone journey, gather the following materials and tools:
Materials:
- Pine cones (size and type as per your preference)
- Twine, string, or fishing line (choose according to the visual impact you desire)
- Paint or spray paint (optional, for customization)
- Glitter or craft glue (for added sparkle, optional)
- Small ornaments (like beads, feathers, or dried flowers, based on your aesthetic)
Tools:
- Scissors
- Hot glue gun (or regular glue if preferred)
- Paintbrush (if you are painting)
- Wire cutter (if you’re using wire)
- A drill (if you want a neat hole for the hanging element)
step-by-step guide: how to create Hanging Pine Cone Idea
Creating your own Hanging Pine Cone decoration is a straightforward process. Follow these steps to make your unique decor piece:
ANNONCE
Step 1: Gather Your Pine Cones
Select pine cones that appeal to you. They can be small or large, depending on the scale of your project. Remember to clean them thoroughly to remove any dirt or sap.
Step 2: Prepare the Pine Cones
If you desire a more vibrant look, consider painting the pine cones. Apply one or two coats of paint using a paintbrush, and let them dry completely. For added texture, you can sprinkle some glitter on the wet paint.
Step 3: Cut the Wire/String
Decide how long you want your hanging pieces to be. Cut pieces of twine or fishing line to your desired length. Keep in mind to add a bit extra for knots.
Step 4: Attach the String to the Pine Cones
Using a hot glue gun, adhere one end of your string to the top of each pine cone. Make sure it’s secure, as this will hold the pine cone when hung.
ANNONCE
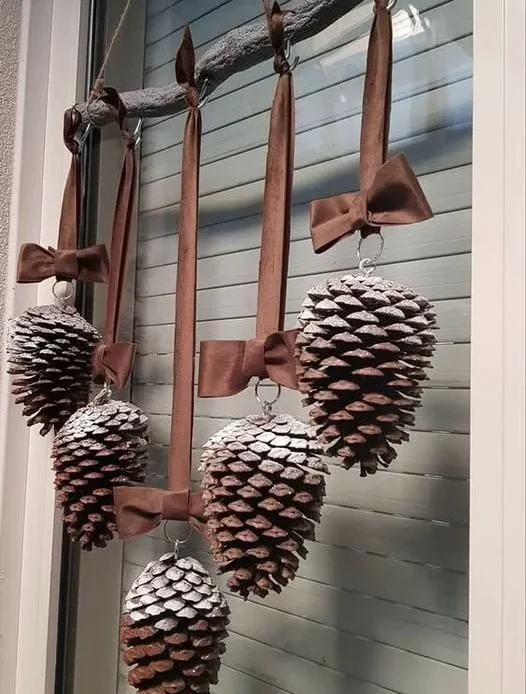
Step 5: Create a Cluster (Optional)
If you wish to create a cluster effect, use various lengths of string to suspend multiple pine cones at different heights. This adds depth to your hanging display.
Step 6: Hang Your Creation
Choose a spot in your home where the decoration will be highlighted. You can hang them from a branch, a wall hook, or even a chandelier. Ensure that they are secure and not too close to any flames or hot surfaces (especially if using glue).
how to attach or secure Hanging Pine Cone Idea elements
Securing the various elements of your Hanging Pine Cone decoration is crucial for both aesthetic appeal and safety. Here are some techniques:
- Knotting: If you’re using twine, tie a secure knot after adhering to the pine cone. This ensures it doesn’t slip or come loose.
- Drilling: For a cleaner look and extra security, drill a small hole at the top of the pine cone. This takes a bit of finesse, but it’s worth it if you want a snug fit for your hanging element.
- Hot Glue: A generous amount of hot glue can hold items in place. Make sure to allow it to cool and harden completely before handling.
- Balanced Arrangement: When hanging multiple pine cones, ensure they are not all in one side of the line. Distributing the weight helps keep your creation secure.
factors affecting quantity of materials for Hanging Pine Cone Idea
The amount of materials you will need depends on various factors:
ANNONCE
-
Size of the Pine Cones: Larger pine cones may require more material (like twine or glue) and make for a more prominent statement piece. Smaller cones can allow you to create clusters.
-
Desired Look: If you plan to paint or embellish your pine cones, your budget for paints and decorations may increase.
-
Hanging Arrangement: If you want to craft one long strand or multiple shorter strands, this affects the quantity of materials required.
-
Decorative Elements: Adding additional features, like beads or ornaments, will require extra materials.
budget-friendly tips for Hanging Pine Cone Idea
There are ways to keep this project cost-effective without sacrificing quality:
- Collecting Pine Cones: Gather pine cones from your local area; it’s a free resource that is both sustainable and plentiful.
- Utilize Materials at Home: Look around your home for leftover paints, twine, or embellishments that can be repurposed for your project.
- DIY Paints: Instead of buying specialty paints, consider making your own using household items like vinegar and food coloring.
- Bulk Buying: If you need to buy any materials, consider purchasing in bulk to save money.
money-saving tips for Hanging Pine Cone Idea
Maximizing savings while ensuring the project stays fun and creative is essential. Here are some money-saving tips:
- Reuse and Recycle: Repurpose items you already own. Old fabric scraps can make great embellishments or hanging attachments.
- Join Local Craft Groups: Engaging with local crafting communities can provide access to shared tools, resources, and ideas to keep costs down.
- Plan Seasonal Decor: If you make seasonal hanging pine cones, reuse the same ones year after year. Store them properly to prevent wear and tear.
- Volunteer for Swaps: Swap crafting materials with friends or community members. This can introduce new items into your decor without any cost.
FAQs about creating Hanging Pine Cone Idea
1. Can I hang pine cones outside?
Absolutely! Hanging pine cones can be a beautiful addition to your outdoor space. Ensure they are securely fastened and will withstand outdoor elements.
2. Do I need to seal my pine cones after painting them?
If you’re concerned about maintaining the paint and its appearance in varying humidity levels, consider using a clear sealant spray to protect the finish.
ANNONCE
3. How can I make my pine cones smell good?
To infuse pleasant scents, consider applying essential oils to the pine cones before hanging them. Cedarwood or pine essential oils can enhance the natural fragrance.
your turn to create Hanging Pine Cone Idea
Now that you have the knowledge and inspiration, it’s your turn to create your own Hanging Pine Cone Idea. Whether you choose to go bold with colors or keep it rustic and natural, allow your creativity to shine. Gather your materials, involve your family, and make this a delightful craft project. You’ll enjoy the satisfaction of creating something beautiful while also relishing those nostalgic connections to nature. Remember, each pine cone tells a story – and now, it’s your story to tell in your own home. Enjoy crafting!